WebSocket platform#
The WebSocket Platform allows an agent to communicate with the users using the WebSocket bidirectional communications protocol.
This platform implements the WebSocket server, and it can establish connection with a client, allowing the bidirectional communication between server and client (i.e. sending and receiving messages).
The next figure shows how this connection works:
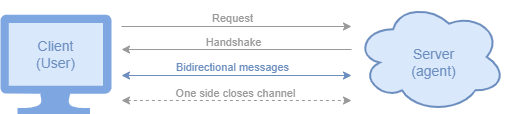
Figure illustrating the WebSocket protocol.#
User Interface
BAF comes with some User Interfaces (WebSocket clients) to use the WebSocket platform.
Of course, you are free to use or create your own UI as long as it has a WebSocket client that connects to the agent’s WebSocket server.
(Their source code can be found in the baf.platforms.websocket package)
Note
There are some properties the agent needs in order to properly set the WebSocket connection. More details in the configuration properties documentation.
Restricting allowed origins#
By default, the WebSocket server accepts connections from any origin. You can restrict which origins are
allowed to connect by setting the origins property in your config.yaml:
platforms:
  websocket:
    host: localhost
    port: 8765
    origins:
      - "https://editor.besser-pearl.org"
      - "https://localhost:8000"
When origins is set, the server will reject WebSocket upgrade requests from any origin not in the list.
When not set (default), all origins are accepted.
How to use it#
After you instantiate your agent, simply call the following function:
agent = Agent('example_agent')
...
websocket_platform = agent.use_websocket_platform(use_ui=True)
If you don’t want to use the UI we provide, simply set use_ui to False.
After that, you can use the platform to send different kinds of messages to the user (from state bodies):
Text messages (strings):
websocket_platform.reply(session, 'Hello!')
Text messages in Markdown format:
websocket_platform.reply_markdown(session, """
    # Welcome to the agent experience
    ## Section 1
    - one
    - two
""")
Text messages in HTML format:
websocket_platform.reply_html(session, """
    <h1>Title</h1>
    <ul>
        <li>Apples</li>
        <li>Bananas</li>
        <li>Cherries</li>
    </ul>
""")
Pandas DataFrames:
websocket_platform.reply_dataframe(session, df)
List of options (buttons): Display a list of options as buttons and let the user choose one
websocket.reply_options(session, ['Yes', 'No'])
Plotly figure:
websocket_platform.reply_plotly(session, plot)
Files:
file = File(file_name="name", file_type="type", file_base64="file_base64")
websocket_platform.reply_file(session, file)
Locations:
latitude, longitude = 49.50177449302207, 5.94862573528648
websocket_platform.reply_location(session, latitude, longitude)
RAG Messages:
rag_message: RAGMessage = session.run_rag()
websocket_platform.reply_rag(session, rag_message)
⏳ We are working on other replies (files, media, charts…). They will be available soon, stay tuned!
The WebSocket platform allows the following kinds of user messages:
Text messages
Voice messages
Files
Enabling persistent user sessions#
When building your own UI on top of the WebSocket API, implement user authentication so every connection can be tied to a stable identifier. BAF maps connections to sessions using either the X-User-ID header or the user_id query parameter from the handshake URL. If both are provided, the header takes precedence. If neither identifier is available, the platform treats the connection as a new anonymous user.
Once your client authenticates users, include the identifier in the WebSocket handshake headers:
ws = websocket.WebSocketApp(
    f"ws://{host}:{port}/",
    header={"X-User-ID": user_id},
    on_open=on_open,
    on_message=on_message,
    on_error=on_error,
    on_close=on_close,
    on_ping=on_ping,
    on_pong=on_pong,
)
If you cannot control the HTTP headers, you can also attach the identifier as a query parameter on the WebSocket URL:
ws = websocket.WebSocketApp(
    f"ws://{host}:{port}/?user_id={user_id}",
    on_open=on_open,
    on_message=on_message,
    on_error=on_error,
    on_close=on_close,
    on_ping=on_ping,
    on_pong=on_pong,
)
On the agent’s side, you’ll need to start the monitoring database and set the persist_sessions=True parameter when initializing the agent:
agent = Agent('example_agent', persist_sessions=True)
Requesting the chat history for a session#
If your UI client wants to request the chat history for a given session (for example, when a user reconnects after a disconnection), it can do so by sending a message with the action FETCH_USER_MESSAGES and the corresponding user_id in the payload:
payload = Payload(
    action=PayloadAction.FETCH_USER_MESSAGES,
    message=None,
    user_id=username,
)
The websocket platform will start by sending the previous messages to the client with a flag “history” set to True, so the client can differentiate between historical messages and new incoming messages.
Communication between agents: Multi-agent systems#
An agent can communicate, not only with human users, but with other agents as well. When we design such agents they become a multi-agent system.
A multi-agent or agentic system is an approach to solve complex problems by defining multiple agents to tackle specific tasks. These tasks divide the main problem into smaller and easier to handle problems. With these systems, we get:
Easier agentic design: divide your problem into small tasks and create a simpler agent for each of them.
Modular design: each agent acts as an independent actor and can be part of many agentic systems, being called from and when necessary.
The communication between agents is done thanks to the WebSocketPlatform. An agent A can send a message to another agent B by simply connecting to agent B’s WebSocket platform:
# Agent A
def get_weather_body(session: Session):
    # Send message to Agent B, providing its WebSocketPlatform address and the message
    session.send_message_to_websocket('ws://localhost:6000', session.message)
Agent B will receive the message and will treat it the same way as if it was a human message. It will create a new session for agent A, detect the intent, transition to another state, etc.
# Agent B, let's assume this state is run when it receives agent A's message
def generate_weather_body(session: Session):
    # Some code to get the weather from the message agent A sent
    temperature = api.get_weather(session.message)
    # Send the temperature to the session's user (i.e., agent A)
    session.reply(temperature)
After that, agent A will receive agent B’s message (the temperature), which will trigger intent classification, transition to another state, etc.
# Agent A's next state
def show_weather_body(session: Session):
    # Just print what Agent B sent, i.e., the temperature
    session.reply(session.message)
API References#
Agent:
baf.core.agent.AgentAgent.use_websocket_platform():
baf.core.agent.Agent.use_websocket_platform()Session:
baf.core.session.SessionSession.reply():
baf.core.session.Session.reply()Session.send_message_to_websocket():
baf.core.session.Session.send_message_to_websocket()WebSocketPlatform:
baf.platforms.websocket.websocket_platform.WebSocketPlatformWebSocketPlatform.reply():
baf.platforms.websocket.websocket_platform.WebSocketPlatform.reply()WebSocketPlatform.reply_dataframe():
baf.platforms.websocket.websocket_platform.WebSocketPlatform.reply_dataframe()WebSocketPlatform.reply_file():
baf.platforms.websocket.websocket_platform.WebSocketPlatform.reply_file()WebSocketPlatform.reply_location():
baf.platforms.websocket.websocket_platform.WebSocketPlatform.reply_location()WebSocketPlatform.reply_options():
baf.platforms.websocket.websocket_platform.WebSocketPlatform.reply_options()WebSocketPlatform.reply_plotly():
baf.platforms.websocket.websocket_platform.WebSocketPlatform.reply_plotly()WebSocketPlatform.reply_rag():
baf.platforms.websocket.websocket_platform.WebSocketPlatform.reply_rag()